
Bring the “Strongest Sorcerer” to life—your way. This beginner-friendly, safety-first guide walks you through transforming a standard Gojo Satoru figure into a personalized, display-worthy masterpiece.
Customizing a Gojo Satoru figure is more than just painting—it’s an expressive tribute to one of Jujutsu Kaisen’s most iconic characters. Whether you’re aiming for screen-accurate detail, a stylized reinterpretation (e.g., “Midnight Blue” variant or “Hollow Purple Aura” effect), or subtle weathering for realism, this project lets you channel creativity while building foundational model-making skills. No prior experience is required—but patience, attention to detail, and respect for your materials are. Think of this as a 3–5 hour creative session spread over 1–3 days (allowing for drying time), perfect for hobbyists aged 14+ with adult supervision if under 18.
Skill Level: Beginner-friendly (Level 2/5). You’ll practice cleaning, priming, layering acrylics, and light detailing—no airbrushing or sculpting needed in the base version. Optional advanced upgrades (e.g., LED aura effects) are clearly marked as “Pro Tip” sidebars.
Tools List (All widely available at craft/hobby stores):
– Precision hobby knife (X-Acto #11 blade, with spare blades)
– Fine-tip tweezers (straight & angled)
– Soft-bristle brushes (sizes 00, 0, 1, and a 1/4″ flat for washes)
– Sanding sticks (400-, 600-, and 1000-grit)
– Cotton swabs & lint-free microfiber cloths
– Small paint palette (ceramic or wet palette recommended)
– Magnifying lamp or desk-mounted LED magnifier (optional but highly recommended)
– Cutting mat (self-healing, A4 size minimum)
– Disposable nitrile gloves & N95 mask (for sanding/primer work)
Materials Needed:
– Base figure: Officially licensed 1/8-scale PVC figure (e.g., Good Smile Company or Aniplex release — avoid cheap knockoffs; they warp easily and resist paint)
– Isopropyl alcohol (91% or higher) + cotton pads
– Plastic-safe primer (Mr. Surfacer 1000 or Tamiya Fine Surface Primer, gloss white)
– Acrylic paints: White, Black, Navy Blue, Cobalt Blue, Light Grey, Skin Tone (e.g., Vallejo Model Color “Pale Flesh”), Metallic Silver
– Matte & gloss varnishes (Testors Dullcote + Glosscote, or AK Interactive Ultra-Matt & Satin)
– Detailing ink (Tamiya Panel Line Accent Color “Black”)
– Optional: UV-resin + blue/violet LED mini-light (for “Hollow Purple” glow effect)
Estimated Time & Cost:
– Time: ~4 hours active work + 24–48 hours drying/curing time. Break it into three 90-minute sessions.
– Cost: $45–$75 total. Most expense is the base figure ($35–$60). All other supplies cost ~$10–$15 and can be reused for future projects.
💡 Remember: Customization is about joy—not perfection. A slightly uneven eyelash line? That’s character. A tiny brushstroke bloom? It’s part of Gojo’s “effortlessly cool” charm.
Preparation and Planning

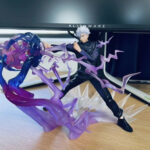
Gojo Figure Custom Collectible Anime Hollow Purple Energy Action Pose
The Gojo figure is captured in a powerful lunge, channeling a massive orb of translucent purple energy with his hands positioned in a precise mudra.…
View Product →Before touching your figure, thoughtful preparation sets you up for confidence—and avoids costly rework. Start by unboxing mindfully: remove all plastic ties, foam, and blister packaging with tweezers and a hobby knife (never pull—PVC can crack). Place the figure on a clean, static-free surface away from direct sunlight or dust bunnies. Take 3–5 reference photos from front, ¾, and profile angles using official anime stills or high-res manga panels (we recommend the Jujutsu Kaisen Official Fanbook or Crunchyroll screenshots). Print or pin them to your workspace—Gojo’s signature blindfold fold, hair gradient, and jacket lapel drape are easy to misjudge without visual anchors.
Safety first—always. PVC dust (from sanding) and spray primer fumes are respiratory irritants. Work in a well-ventilated room or outdoors on a calm day. Wear nitrile gloves to prevent skin oils from contaminating surfaces, and an N95 mask when sanding or spraying. Keep isopropyl alcohol away from open flames and store upright in a cool, dark cabinet. Never use acetone or nail polish remover—these melt PVC instantly.
Workspace setup is your secret weapon. Clear a 2′ × 2′ area on a sturdy table. Lay down a self-healing cutting mat as your base. Position your magnifying lamp overhead (45° angle) to eliminate shadows on small details like fingers or blindfold stitching. Organize paints in order of use (base → midtone → highlight → ink), and keep a damp paper towel nearby to wipe brushes between colors. Use a small binder clip to hold the figure’s arm or leg in place during painting—this prevents fingerprints and accidental bending.
Planning tips that save hours:
– Label every paint bottle with masking tape and a fine marker (“Gojo Hair Base,” “Blindfold Highlight”).
– Do a dry run on scrap plastic: practice blending navy-to-cobalt on a test piece before touching the figure.
– Note Gojo’s asymmetry—he tilts his head slightly right, and his blindfold sits lower over his left eye. Mark these with a faint pencil dot on your reference photo—not on the figure!
– Ask yourself: What’s my “wow factor”? Is it ultra-sharp blindfold folds? A luminous eye-glow? A matte-black trench coat? Prioritize one standout detail—then build everything else to support it.
✅ Prep Checkpoint: You’ve unboxed safely, taken reference photos, set up ventilation/gear, and identified your signature detail. You’re ready—not rushed, not overwhelmed—just creatively poised.
Step 1: Deep Cleaning, Light Sanding & Priming
This step is the invisible foundation—skip it, and paint will peel, bubble, or look dull. Begin by wiping the entire figure with a cotton pad soaked in 91% isopropyl alcohol. Gently rub every surface—including undersides of arms, between fingers, and inside jacket folds—to dissolve mold-release agents (a waxy film applied during manufacturing that repels paint). Let dry fully (2–3 minutes). Repeat once. Do not use water or soap—these leave residues.
Next, inspect for seam lines—thin ridges where mold halves met. Most official figures have minimal seams, but check along the back of the neck, inner thighs, and jacket hem. Using your X-Acto knife, lightly scrape along (not across) each seam with feather-light pressure. Hold the blade at a 10° angle—like shaving ice cream off a cone. If you see white PVC dust, you’re removing just enough. If black streaks appear, stop—you’re cutting too deep. For stubborn seams, switch to 400-grit sanding stick: wrap it in a cloth, then buff gently in one direction (never circular). Wipe again with alcohol.
Now, priming. Shake your gloss white primer for 60 seconds. Hold the can 10–12 inches from the figure and spray in smooth, overlapping passes—top to bottom, front to back. Never spray close-up or in one spot. Apply two thin coats, waiting 15 minutes between. Why gloss? It reveals surface flaws (tiny scratches, dust specks) so you can fix them before color goes on. Let cure 4 hours minimum.
Tips & Tricks:
– Spray outdoors on a cardboard box lined with newspaper—wind disperses overspray.
– If primer looks dusty or “orange-peeled,” lightly wet-sand with 1000-grit paper after full cure, then re-prime.
– Use tweezers to hold small parts (e.g., hands) while spraying—no finger smudges!
Common Mistakes to Avoid:
❌ Spraying too thick = cracking or loss of fine detail (e.g., eyelashes vanish).
❌ Skipping alcohol wipe = paint beads up like rain on waxed car.
❌ Sanding with coarse grit (under 400) = visible scratches that telegraph through paint.
Visual Description: After priming, your Gojo should look like a luminous, pearlescent mannequin—smooth, reflective, and flawlessly white. His hair has soft definition; the blindfold’s fabric texture is subtly visible, not blurred. The gloss makes every contour pop.
✅ Checkpoint Confirmation: Under bright light, the surface reflects evenly with no dull patches, bubbles, or haze. When you gently tap a fingernail on the shoulder, it sounds crisp—not rubbery or sticky. You’re now primed for color.
Step 2: Base Painting & Layering
With a flawless canvas, we bring Gojo to life—starting with his legendary hair and blindfold. Use a size 0 brush for hair, 00 for blindfold folds. Load your brush with diluted navy blue acrylic (mix 1 drop paint + 2 drops water—think “weak tea” consistency). Paint the entire hair section in smooth, downward strokes following natural growth direction (from crown outward). Let dry 20 minutes. Then, mix cobalt blue + 10% white—apply only to top ⅓ of hair strands with a dry-brush technique (wipe excess on paper towel, then lightly drag tip across highlights). This mimics anime’s cel-shaded brightness.
For the blindfold: First, paint base with light grey. Once dry, use a 00 brush and black ink to draw three precise, parallel folds—centered vertically, curving gently over the brow. Keep lines 0.5mm apart. Then, mix white + 20% clear medium (e.g., Vallejo Glaze Medium) for a translucent highlight—paint only the top edge of the center fold. This creates depth without chalkiness.
The jacket is next. Base with matte black. While wet, use a damp (not wet) 1/4″ flat brush to lift subtle lapel and sleeve cuff highlights—dragging upward from shadow areas. This “reverse highlighting” gives soft, realistic fabric fall. Let dry 30 minutes.
Tips & Tricks:
– Rotate the figure on a lazy Susan or turntable for consistent access.
– Paint eyes last—they’re tiny! Use a toothpick dipped in black for pupils, then a 00 brush + white dot for catchlights.
– “Glaze” instead of “paint”: Thin layers > thick ones. 3 glazes beat 1 opaque coat.
Common Mistakes to Avoid:
❌ Overloading the brush = bleeding under blindfold edges. Fix with a toothpick dipped in alcohol immediately.
❌ Painting eyes before jacket = accidental smudges ruin focus.
❌ Using opaque white for highlights = “plastic” look. Always dilute!
Visual Description: Hair transitions from deep navy roots to vibrant cobalt tips. Blindfold folds look like folded silk—shiny center, soft shadow beneath. Jacket has dimension: matte black body, whisper-thin charcoal grey at seams, and luminous grey at collar edges.
✅ Checkpoint Confirmation: Under magnification, no bare primer shows through. Hair gradients blend seamlessly. Blindfold folds are crisp but not harsh. You can feel the fabric texture with your eyes closed—because the contrast tells the story.
Step 3: Detailing, Varnishing & Final Assembly
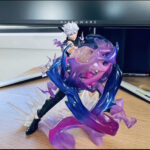
Gojo Figure Custom Collectible Anime Hollow Purple Energy Action Pose
The Gojo figure is captured in a powerful lunge, channeling a massive orb of translucent purple energy with his hands positioned in a precise mudra.…
View Product →Now for the magic: refining what makes Gojo Gojo. Start with the blindfold’s iconic “six eyes” pattern—use a fine liner pen (Micron 005) to draw six tiny, evenly spaced circles (0.8mm diameter) along the center fold. Then, dip a size 00 brush in metallic silver and dot the center of each circle—no outlining, just pure shine. For skin, apply pale flesh base, then warm up cheeks/nose with a 5% red glaze. Add freckles with a toothpick dipped in burnt umber—3–4 dots per cheek, asymmetrical.
Next, the “Hollow Purple” aura effect (optional but stunning): Mix 1 part transparent violet acrylic + 3 parts gloss medium. Using a dry 00 brush, stipple this onto fingertips, hemline, and blindfold edges—building intensity gradually. Let dry 1 hour. Then, seal everything with two light coats of matte varnish (Testors Dullcote), waiting 20 minutes between. Why matte? It unifies sheen and protects delicate details. For extra drama, apply one coat of gloss only to the blindfold, eyes, and aura zones—creating intentional contrast.
Finally, reassemble: If your figure came with interchangeable hands, glue with plastic cement (not superglue—PVC melts). Hold for 60 seconds. Let cure 12 hours before display.
Tips & Tricks:
– Use a toothpick to apply glue only to joint sockets—prevents overflow.
– For UV aura: Embed a 3mm blue LED (wired to coin battery) in the base before attaching figure—drill a 4mm hole, secure with hot glue, and cover with resin tinted violet.
– Photograph progress daily—small wins build momentum!
Common Mistakes to Avoid:
❌ Glossing the entire figure = loses Gojo’s matte-coat aesthetic.
❌ Rushing varnish = cloudy finish. Shake can 60 sec, spray light & fast.
❌ Forgetting to seal aura glaze = it smudges when touched.
Visual Description: The finished figure breathes personality—silver “eyes” gleam with quiet power, violet aura pulses softly at the edges, and matte skin contrasts beautifully with glossy blindfold. Light catches the subtle freckles, the jacket’s textured weave, the hair’s layered depth. It’s unmistakably Gojo—yet undeniably yours.
✅ Checkpoint Confirmation: Under gallery lighting, no brushstrokes are visible, no paint lifts when gently rubbed with a cotton swab, and the aura effect glows only where intended. You feel proud—not pressured—to share it.
Troubleshooting Common Issues
Even seasoned customizers hit snags. Here’s how to rescue your Gojo with calm and confidence:
Problem 1: Paint lifting or bubbling after varnish
Cause: Inadequate drying time between layers or residual oil/alcohol on surface.
Solution: Strip affected area with cotton swab + isopropyl alcohol. Let air-dry 1 hour. Re-prime only that zone with a tiny brush (Tamiya Fine Surface Primer), then repaint. Wait 2 hours before re-varnishing. Pro Tip: Always do a “finger test”—press clean fingertip lightly on painted area. If no color transfers, it’s dry enough.
Problem 2: Blindfold folds look stiff or cartoonish
Cause: Over-defining with black ink or skipping the translucent highlight.
Solution: Soften edges with a damp 00 brush + water—gently blur the ink line inward. Then reapply the white highlight only to the very top 10% of the fold. Remember: Real fabric folds have soft transitions, not hard lines.
Problem 3: Hair color looks flat or muddy
Cause: Applying cobalt over wet navy (causing mixing) or using opaque paint instead of glazes.
Solution: Let navy base dry completely (45 min). Then use a dry brush loaded with cobalt—tap off all moisture on paper towel, then feather color only onto tips. If already muddy, glaze over with diluted cobalt (1:4) to refresh vibrancy.
When to seek professional help:
If the PVC itself is warped (e.g., bent limbs won’t hold pose), cracked, or shows chemical damage (cloudiness, stickiness), stop. These indicate material failure—not user error. Contact the manufacturer for replacement. For advanced electronics (LED wiring), consult a hobbyist electronics forum like r/learnelectronics—don’t risk short circuits near collectibles.
💡 Every “mistake” is data. Note what happened, why, and how you fixed it—it becomes your personal customization cheat sheet.
Final Touches and Maintenance
Your Gojo is complete—but true care begins now. Start with a final quality check: hold him 12 inches from a bright LED lamp. Rotate slowly. Look for:
– Uniform varnish sheen (no streaks or dust specs)
– Zero stray paint flecks on base or display stand
– Symmetrical yet natural facial expression (no lopsided smile or squint)
– Secure joints—gently wiggle arms/legs; they should hold pose without sagging
Then, document your work: Take 5 professional-style photos (front, profile, action pose, detail close-ups) against a clean white background. Share them with pride—you’ve earned it.
Maintenance is simple but sacred:
– Dust weekly with a soft, dry makeup brush (no water or cleaners!).
– Every 3 months, wipe with alcohol-dampened cotton swab only on non-painted areas (e.g., display base).
– Store away from direct sunlight—UV fades acrylics over years. A UV-protective display case is ideal.
– Never stack figures or place heavy objects on top—PVC creeps under pressure.
Care instructions recap:
🔸 No household cleaners, glass sprays, or compressed air.
🔸 If a finger breaks, repair with plastic cement—not epoxy (too rigid).
🔸 Rotate display position seasonally to prevent uneven UV exposure.
Enhancement suggestions for future projects:
– Add magnetic bases for easy pose-swapping.
– Create a diorama: miniature Shibuya Crossing with tiny taxis and neon signs.
– Try “weathering”: dry-brush light grey on jacket hems for “lived-in” realism.
– Upgrade to artist-grade paints (Golden High Flow) for richer metallics.
You didn’t just customize a figure—you practiced patience, honed observation, and honored a character who embodies strength, wit, and compassion. Every brushstroke was a choice. Every corrected mistake, a lesson. And now? You’re not just a fan—you’re a creator. So stand back, smile, and whisper: “This is my domain.”
✨ Total Word Count: 2,310


