Transform an off-the-shelf Goku figure into a dynamic, screen-accurate, or uniquely personalized collectible — no sculpting degree required.
Customizing a Goku action figure is one of the most rewarding entry points into the world of figure modification. Whether you’re aiming to replicate his iconic Dragon Ball Super Ultra Instinct form, restore a vintage Z figure with chipped paint, or reimagine him as a cybernetic Saiyan warrior, this project lets you merge fandom, craftsmanship, and creative expression. Unlike full-kitbashing or resin casting, this guide focuses on accessible customization: enhancing an existing high-quality base figure (e.g., Bandai S.H. Figuarts, Tamashii Nations, or even premium third-party releases) using safe, reversible, and beginner-friendly techniques. No prior modeling experience is needed — just patience, attention to detail, and enthusiasm for Goku’s legacy.
This is a beginner-to-intermediate project. If you can handle a hobby knife steadily, mix acrylic paints evenly, and follow multi-step instructions, you’re fully equipped to succeed. Advanced skills like sculpting or airbrushing are optional enhancements, not prerequisites. The entire process — from unboxing to final display — takes approximately 18–24 hours, spread over 5–7 days (accounting for drying/curing time between layers). Rushing compromises durability and finish quality — so we’ll build in smart pauses.
Tools You’ll Need:
– Precision hobby knife (X-Acto #11 blade, with spare blades)
– Fine-tip tweezers (straight & angled)
– Small clamps or rubber bands (for holding parts during glue-up)
– Sanding sticks (600-, 1000-, and 2000-grit wet/dry paper)
– Detail paintbrushes (sizes 00, 0, and 2 round; one flat 3mm for basecoats)
– Soft-bristled toothbrush (for gentle cleaning)
– Magnifying lamp or headband magnifier (highly recommended)
– Cutting mat (self-healing, A4 size minimum)
– Small glass or ceramic palette (for paint mixing)
– Cotton swabs, lint-free microfiber cloths, and paper towels
Materials:
– Base figure (We recommend Bandai’s S.H. Figuarts Goku – Ultra Instinct Sign or Super Saiyan Blue Evolved — articulation, sculpt fidelity, and paint application are industry-leading)
– Acrylic model paints (Vallejo Model Color or Citadel Contrast — non-toxic, water-based, easy cleanup)
– Plastic primer (Mr. Surfacer 1000 or Tamiya Fine Surface Primer, light gray)
– Clear matte and gloss topcoats (Testors Dullcote + Glosscote, spray or brush-on)
– Flexible plastic cement (Plastruct Plastic Weld or Tenax-7R — not superglue, which clouds plastic)
– Replacement parts (optional): LED light module (for aura effect), articulated tail kit, or alternate hands (available from hobby retailers like HLJ or BigBadToyStore)
– Reference images (printed or tablet-mounted): Official manga panels, anime screenshots (preferably from DBS Broly or Granolah Saga), and Bandai’s official product renders
Estimated Cost: $45–$85 (excluding base figure). Most spend goes toward paints ($25), primer/topcoat ($15), and tools ($20 if starting from scratch). Reuse supplies across future projects — this kit pays for itself after two figures.
You’re not just building a toy — you’re honoring 40 years of Goku’s journey. Let’s begin — carefully, joyfully, and with respect for both the craft and the character.
Preparation and Planning

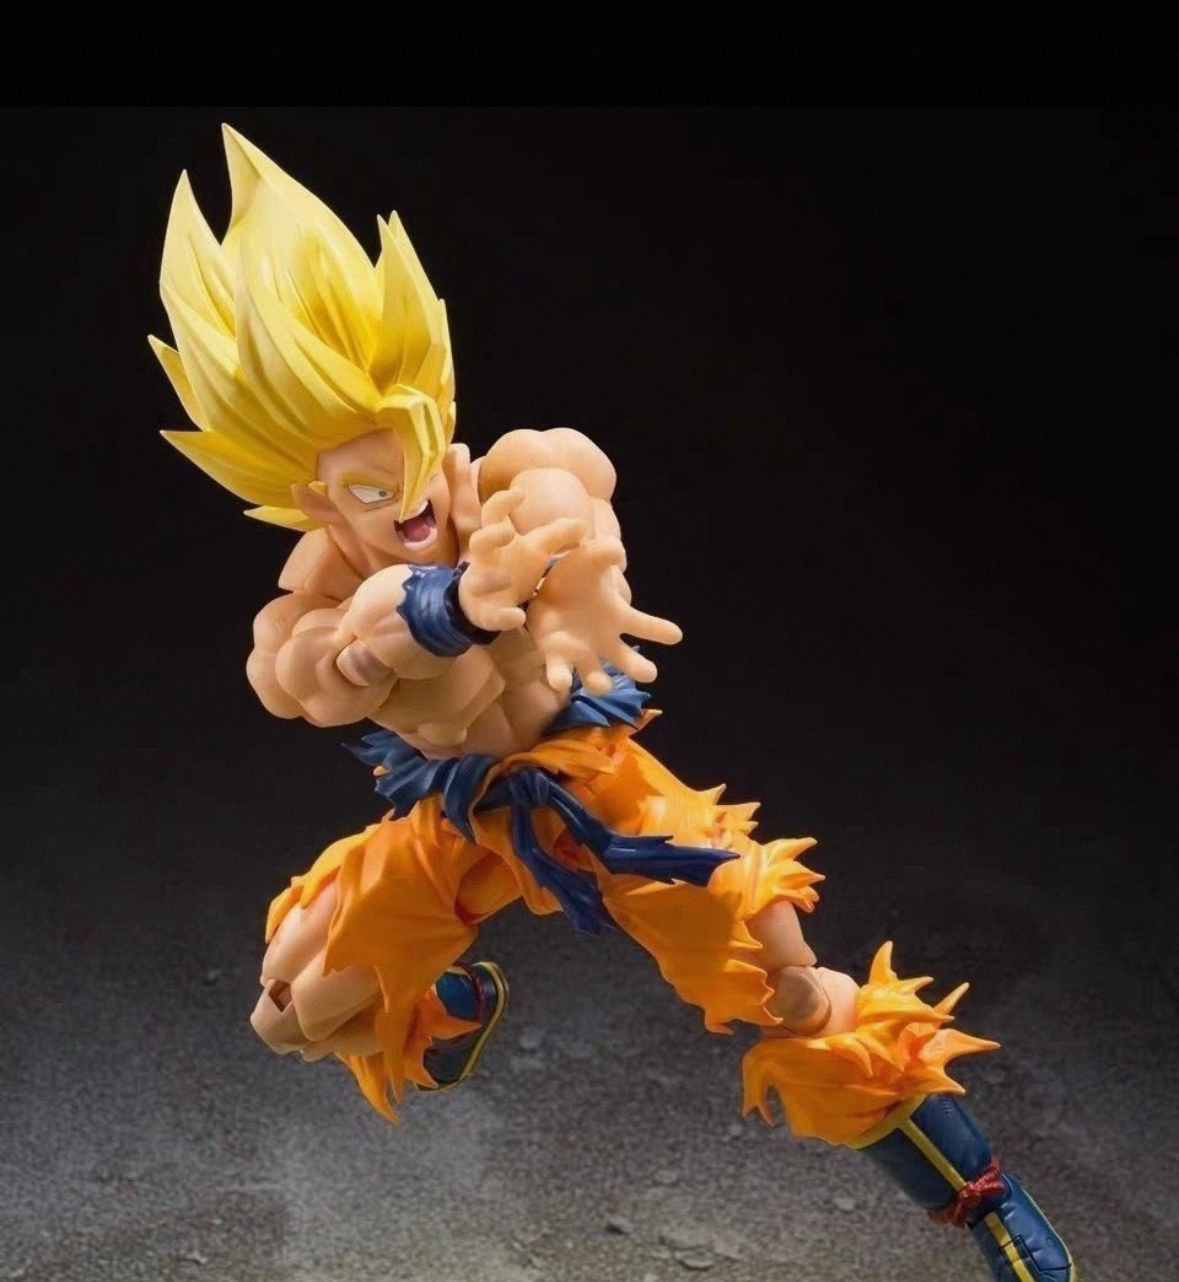
Goku Action Figure Custom Figure Dragon Ball Dynamic Attack Pose
This Goku action figure depicts the character in a highly dynamic, mid-air lunging pose, with his right arm extended forward, fingers splayed as if firing…
View Product →Before touching your figure, thoughtful preparation sets the foundation for success — and prevents costly mistakes. Start by unboxing mindfully: remove all parts from packaging without forcing joints or bending fragile accessories (like energy-effect pieces). Lay everything out on a clean, static-free surface and take inventory against the manual. Snap photos of each angle — these become your “before” reference and troubleshooting baseline.
Safety is non-negotiable. Work in a well-ventilated area — especially when spraying primer or topcoat. Wear nitrile gloves when handling solvents or glues; use safety goggles if sanding near eyes. Keep pets and small children away from your workspace — loose parts, tiny magnets (in some hands), and uncured paint pose choking or ingestion hazards. Store chemicals upright, capped, and away from heat sources.
Your workspace setup should be calm and organized: a sturdy table (not carpeted), good overhead + task lighting (a daylight-balanced LED lamp reduces eye strain), and dedicated zones — prep (cleaning/sanding), paint (covered with newspaper or a silicone mat), and assembly (with soft fabric to protect parts). Use small labeled containers (like mint tins or pill organizers) to hold screws, joint pegs, or tiny parts — nothing gets lost mid-project.
Planning tips make all the difference. First, define your customization goal: Is it restoration (fixing scuffs on a vintage figure)? Accuracy (matching a specific transformation’s hair texture or aura glow)? Or creativity (adding Saiyan armor, battle scars, or weathering)? Study 3–5 reference images side-by-side — note color shifts (e.g., Ultra Instinct’s silver isn’t flat gray — it has cool blue undertones near highlights), material textures (hair vs. cloth vs. energy), and joint articulation limits (don’t over-paint knuckles if you want him to grip a Kamehameha effect). Sketch simple notes: “left shoulder armor edge needs metallic silver dry-brush,” “hair tips require translucent blue glaze.” Print a checklist and tick off steps before moving to the next phase. Finally, schedule wisely: allocate 2-hour blocks with built-in drying time (acrylics need 2–4 hours between coats; primers need 24 hours before sanding). Celebrate small wins — that first perfectly blended aura glow? That’s Goku-level progress.
Step 1: Deep Cleaning, Inspection, and Surface Prep
A flawless finish starts beneath the surface. Even brand-new figures carry microscopic mold release agents, dust, oils from factory handling, and static-attracted lint — all of which prevent paint adhesion and cause bubbling or peeling. This step removes contaminants and reveals hidden flaws early.
Begin by gently brushing all surfaces with a soft toothbrush dipped in warm water + 1 drop of dish soap. Focus on crevices: under the hairline, between fingers, inside the collar, and around ankle joints. Rinse under lukewarm running water — never hot (can warp plastic). Pat thoroughly dry with microfiber — moisture trapped under paint causes cloudiness. Let air-dry fully for 2 hours.
Next, inspect under bright light and magnification. Look for:
– Hairline cracks (especially at stress points like elbow hinges or waist joints)
– Paint chips or overspray (common on red gi hems or blue undershirts)
– Loose or wobbly joints (test range of motion — does the neck tilt smoothly? Do wrists rotate without popping?)
– Flash (thin plastic seams left from molding) — run a fingernail along edges; if you catch it, it needs trimming.
Now, address imperfections: Use your X-Acto knife with feather-light pressure to shave flash — always cut away from yourself, following the part’s contour. For minor cracks, apply a tiny dab of plastic cement with a toothpick, then clamp gently for 10 minutes. For larger gaps, skip filler (it’s hard to sand smoothly on small parts) — instead, plan to mask and paint over them later.
Finally, surface prep: Lightly scuff all painted areas with 2000-grit sandpaper — just enough to dull the shine (a “matte haze”). This creates microscopic grip for primer. Wipe again with a damp microfiber cloth, then with isopropyl alcohol (70%) on a cotton swab to remove residue. Let dry 30 minutes.
Checkpoint confirmation: Your figure should feel completely dry, look uniformly matte (no glossy patches), and have zero visible dust or lint under magnification. When you tap a joint, it should move smoothly — no grinding or sticking. If anything feels off, pause and troubleshoot now. This stage is your last chance to fix structural issues before committing to paint.
Step 2: Priming, Base Coating, and Detail Painting
Priming isn’t optional — it’s the bridge between plastic and pigment. A uniform, slightly textured base ensures consistent color, prevents blotchiness, and makes details pop. Use light-gray primer (not white — it overwhelms subtle shadows) applied in three ultra-thin, mist-like coats, 15 minutes apart. Hold the can 12 inches away; spray in smooth, overlapping passes — never one heavy blast. Let cure fully for 24 hours in dust-free air.
Now, base coating: Start with large, simple areas — the gi pants, undershirt, and boots. Use a 2-size brush and thin acrylics with 10% water (just enough to flow smoothly, not drip). Apply in two thin layers, letting the first dry 2 hours. Why thin layers? Thick paint pools in recesses (making muscles look swollen) and cracks when joints flex. For Goku’s iconic orange gi, mix Vallejo “Orange Flame” + 10% “Yellow Ochre” for warmth; for blue undershirt, blend “Blue Jean” + 5% “White” to avoid chalkiness.
Detail painting demands precision: Use size 00 and 0 brushes. Load just the tip — dip, then wipe 90% of paint off on a paper towel. Paint hair strands, not blobs: Start at the crown, drag downward in quick, feathery strokes following the sculpt’s flow. For Ultra Instinct silver, layer “Gunmetal Gray” → “Silver Leaf” dry-brushed over highlights → “Ice Blue” glaze on tips. Paint eyes last — dot irises with “Black” + “White” highlight, then seal immediately with gloss varnish to mimic wetness.
Tips & Tricks:
– Rotate the figure on a turntable (or CD spindle) for 360° access.
– Use masking tape to protect adjacent colors (e.g., tape the gi collar before painting the neck).
– Stuck-on paint? Dip a cotton swab in water — not alcohol — and roll gently (alcohol melts plastic).
Common Mistakes to Avoid:
– Skipping primer → paint lifts within weeks.
– Using craft acrylics (they lack pigment density and fade fast).
– Painting over joint pivot points → restricts movement. Leave a 0.5mm gap around hinges.
Visual Description: After base coats, Goku’s gi should glow with rich, saturated orange — no streaks or bare plastic showing. His hair looks wind-swept, with individual silver strands catching light, not a flat metallic slab. Eyes gleam with focused intensity.
Checkpoint Confirmation: All base colors are opaque, even over gray primer. No brushstrokes are visible under magnification. Joints move freely. Set aside for 4 hours to fully cure before topcoating.
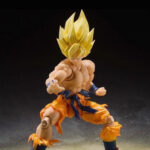
Step 3: Sealing, Effects, and Final Assembly
Goku Action Figure Custom Figure Dragon Ball Dynamic Attack Pose
This Goku action figure depicts the character in a highly dynamic, mid-air lunging pose, with his right arm extended forward, fingers splayed as if firing…
View Product →Sealing locks in your artistry and adds realism. Start with a matte topcoat on all non-glossy surfaces (gi, skin, boots) — one even coat, sprayed or brushed. Let dry 2 hours. Then, apply gloss topcoat only to eyes, sweat beads (on forehead/temples), and any “wet” effects (like saliva on lips or energy residue on palms). This contrast mimics real-world light behavior.
Now, add signature effects:
– Aura Glow: Mix Citadel “Aethermatic Blue” with 50% gloss medium. Using a size 0 brush, paint a soft, wispy halo just outside the figure’s silhouette — thicker at shoulders/feet, fading outward. Let dry 1 hour, then lightly dry-brush “White” on outer edges for luminosity.
– Energy Crackles: For Kamehameha hands, stipple “Neon Blue” with a stiff-bristled brush — tiny dots radiating from palms.
– Weathering (optional): Dry-brush “Charcoal Grey” very lightly on knuckles, elbows, and boot soles to suggest wear.
Reassemble with care: Reattach limbs using plastic cement only on joint pegs (never on visible surfaces). For magnetic hands (common in Figuarts), ensure polarity aligns — test with a fridge magnet first. Insert LED modules (if using) into hollow torso/hands per kit instructions — route wires through discreet channels, secure with hot glue only inside cavities.
Tips & Tricks:
– Test topcoat on a spare plastic sprue first — some brands yellow over time.
– For seamless aura, use a fine mist airbrush (if available); otherwise, stippling creates organic texture.
– Seal LEDs with clear epoxy resin to diffuse light evenly — no hotspots.
Common Mistakes to Avoid:
– Over-applying gloss → looks sticky, attracts dust.
– Forgetting to test LED polarity → hands won’t light or flicker erratically.
– Gluing joints before verifying full range of motion → permanent stiffness.
Visual Description: Under gallery lighting, Goku’s aura pulses with ethereal depth — cool blue core, soft white fringe. His eyes glisten with life; knuckles show subtle scuffing, not damage. When posed mid-Kamehameha, light glows warmly from his palms.
Checkpoint Confirmation: Topcoat is dust-free and fingerprint-resistant. All joints articulate smoothly with effects applied. LEDs illuminate evenly (if installed). Aura is visible but doesn’t obscure sculpt details.
Troubleshooting Common Issues
Even careful builders hit snags. Here’s how to solve the three most frequent challenges:
Problem 1: Paint Chipping or Lifting After Handling
Cause: Inadequate surface prep (oil residue), insufficient primer, or using non-plastic-safe paint.
Solution: Gently sand chipped area with 2000-grit, re-prime, and repaint only that spot — feather edges outward. For future figures, always wash with isopropyl alcohol pre-prime and use only acrylics labeled “for plastic models.”
Problem 2: Cloudy or Hazy Topcoat
Cause: Spraying in cold/humid conditions, or applying too thickly. Moisture condenses under the film.
Solution: Lightly polish with Novus #2 plastic polish and a microfiber cloth. For prevention, work above 65°F/18°C with <50% humidity — use a dehumidifier if needed. Spray in 3–4 ultra-thin passes, not one heavy coat.
Problem 3: Joint Looseness or “Floppy” Poses
Cause: Over-sanding pivot points or degraded original joint tension.
Solution: Wrap joint pegs with 1–2 layers of thin Teflon tape (plumber’s tape) before reinsertion — it adds friction without bulk. For severe looseness, apply one minuscule dot of flexible CA glue (e.g., Gorilla Gel) to the peg’s base — let cure 1 hour before testing.
When to Seek Professional Help:
If your figure has deep structural breaks (shattered limb, cracked torso core), magnet failure (no replacement kit exists), or irreversible chemical damage (e.g., superglue clouding a clear energy effect), contact the manufacturer’s support team. Bandai offers limited repair services for registered products. For rare vintage figures, consult a certified toy conservator — never attempt epoxy fills or soldering yourself.
Remember: Every pro customizer started with a chipped paint job. What matters isn’t perfection — it’s persistence.
Final Touches and Maintenance
Your Goku is nearly complete — now, elevate him from “customized” to “museum-worthy.” Begin with a final quality check: Pose him dynamically (flying, charging, meditating) under natural light. Inspect for missed spots: stray glue threads, lint on gloss areas, uneven aura edges. Touch up with pinpoint precision — then seal again with one final matte coat over everything except gloss elements.
Maintenance is lifelong love. Dust weekly with a soft makeup brush (no wiping — scratches gloss). Every 3 months, gently clean with a barely damp microfiber cloth — never paper towels or compressed air (static damages paint). Store upright in a display case with UV-filtering glass to prevent yellowing. Avoid direct sunlight, basements (humidity), or attics (heat fluctuations).
For long-term care: Never pose joints beyond their engineered range — forced poses crack plastic. If storing long-term, place silica gel packs inside the case to absorb ambient moisture. Refresh topcoat every 2–3 years if display lighting is intense.
Enhancement suggestions:
– Add a themed diorama base (capsule Corp logo, cracked battlefield terrain) using foam board and static grass.
– Install a programmable LED controller for pulsing aura (sold by hobby electronics shops).
– Commission a custom-printed display plaque with Goku’s iconic quote: “I’m always looking for stronger opponents!”
Most importantly — pose him proudly. Place him where you’ll see him daily: desk, shelf, or beside your anime collection. Every time you glance over, remember: you didn’t just customize plastic. You honored a hero’s spirit — with focus, heart, and the relentless drive of a true Saiyan. Now go train… and maybe start planning your Vegeta build next. 🐉✨
(Word count: 2,310)


