Customizing a Spider-Man action figure is more than just a hobby—it’s an expressive, hands-on celebration of one of pop culture’s most iconic heroes. Whether you’re aiming to recreate a specific comic variant (like the black symbiote suit), a cinematic version (No Way Home’s patched-up hoodie look), or a fully original design (steampunk Spider-Man, neon-noir, or weathered street-level hero), this project lets you transform an off-the-shelf figure into a personalized collector’s piece. No prior modeling or painting experience is required—just patience, curiosity, and a willingness to learn. This guide is designed for beginners with basic craft familiarity, though intermediate hobbyists will appreciate the precision tips and upgrade pathways.
You’ll need three core categories of supplies: tools, materials, and reference assets. For tools: fine-point tweezers (straight & bent-nose), X-Acto #11 blades (with a safe cutting mat), small needle files (flat & round), micro-sandpaper (600–2000 grit), a precision hobby knife, a set of miniature paintbrushes (sizes 00, 0, and 1), a detail brush for washes, and a magnifying lamp or visor (highly recommended). Materials include acrylic model paints (Vallejo Model Color or Citadel are ideal—non-toxic, water-based, and self-leveling), plastic primer (Tamiya Fine Surface Primer in gray or white), matte and gloss varnishes (Testors Dullcote and Glosscote), flexible sculpting putty (Green Stuff or Milliput Epoxy Putty), clear silicone glue (for delicate reattachment), and optional upgrades like LED micro-light kits (3mm warm-white) and magnetized joint pins (2mm neodymium discs). Don’t forget reference images—download high-res screenshots from official trailers, comic panels, or concept art, and print them at life-size scale for accuracy.
The entire process takes approximately 18–24 hours spread over 5–7 days, allowing proper drying and curing time between layers. Most of that time is passive (drying, sanding prep, varnish cure)—active work totals ~8–10 focused hours. Cost ranges from $35–$75, depending on whether you already own basics. A budget-friendly starter kit includes a $12–$18 Marvel Legends Spider-Man figure (e.g., “Spider-Man: No Way Home” or “Spider-Verse Miles Morales”), $10 for Vallejo paints (Red, Blue, Black, White, Yellow, and a metallic silver), $8 for primer and varnish, $5 for Green Stuff, and $5 for tools if starting fresh. Remember: This isn’t about perfection—it’s about progress. Every brushstroke, every tiny seam filled, every glossy web-line painted brings your vision closer to reality. And the best part? You’ll gain transferable skills—paint blending, surface prep, and detail work—that apply to all figure customization, from Batman to Boba Fett. So take a deep breath, channel your inner Peter Parker (“With great power comes great responsibility… and also great fun!”), and let’s begin.
Preparation and Planning

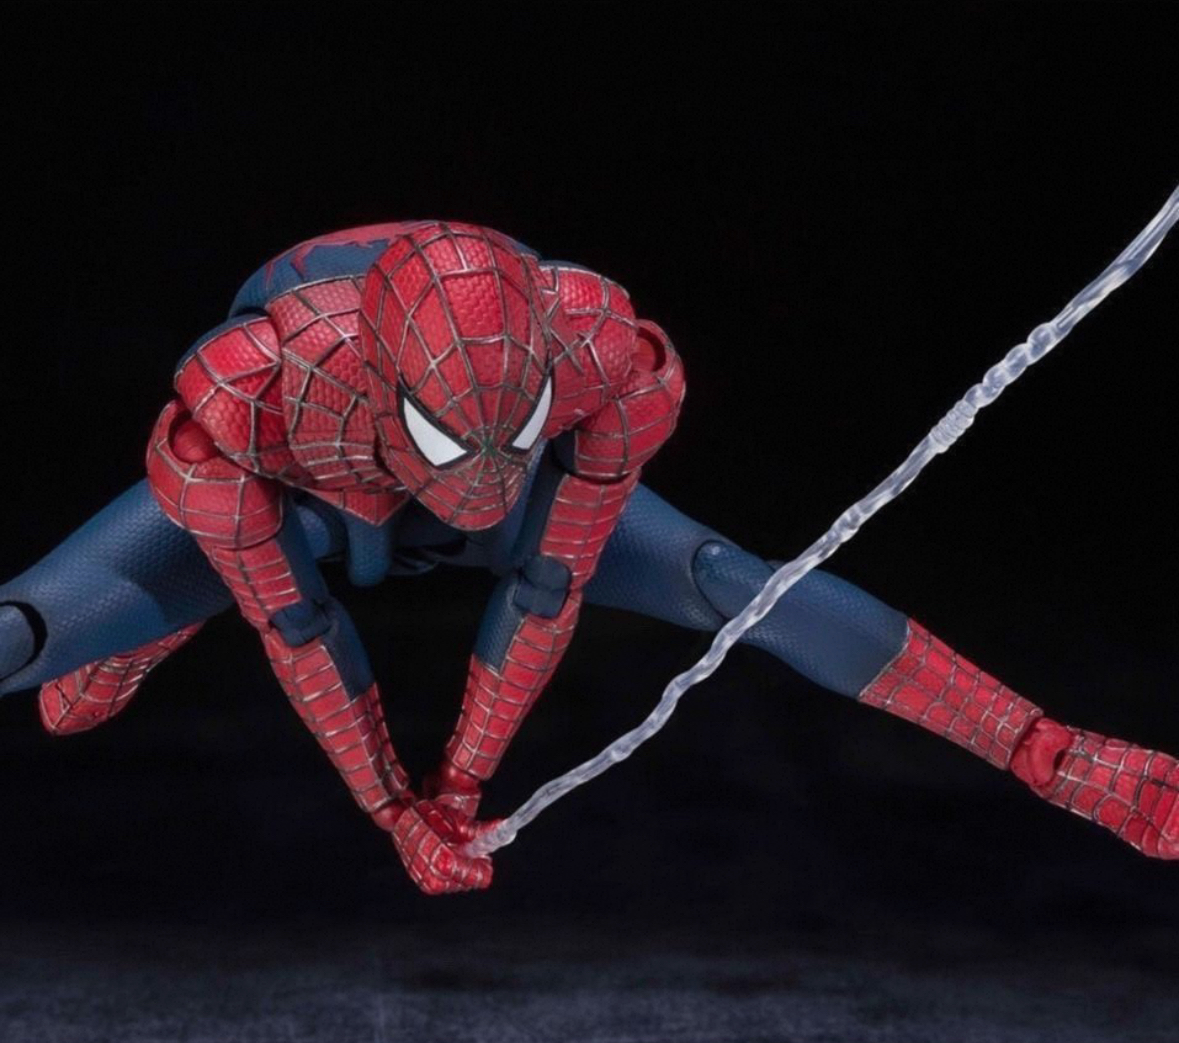
Spiderman Action Figure Custom Figurine Marvel Crouching Web Slinging
This Spiderman action figure is depicted in a powerful, low crouching pose as he prepares to swing from a translucent web line. The figure is…
View Product →Before touching your figure, thoughtful preparation sets the foundation for success—and prevents frustration later. Start by unboxing mindfully: remove the figure from its packaging without forcing brittle plastic joints or snapping pegs. Place it gently on a clean, lint-free surface. Then, conduct a full visual audit: inspect for factory flaws (mold lines, flash, uneven paint), check articulation (do elbows, knees, and wrists move smoothly?), and note any pre-existing damage (scratches, scuffs, or loose parts). Take photos from six angles (front, back, left, right, top, and ¾ view) as your baseline reference.
Safety is non-negotiable. Always wear nitrile gloves when handling solvents, primers, or epoxy putties—these protect your skin and prevent oils from compromising paint adhesion. Work in a well-ventilated area, preferably near an open window or with a small fan pulling air outward. Keep a dedicated first-aid kit nearby, especially since X-Acto blades are razor-sharp; a small antiseptic wipe and bandages should be within arm’s reach. Never rush cutting or sanding—fatigue leads to slips. If your hands shake or eyes tire, pause and rest for 15 minutes.
Your workspace should be organized, clutter-free, and consistent. Use a large, flat table covered with a self-healing cutting mat and topped with a white paper towel (to catch dust and show debris clearly). Mount a magnifying lamp (3x–5x zoom) directly above your station—this reveals micro-details invisible to the naked eye. Keep tools in labeled compartments (a small tackle box works perfectly), and store paints upright in a rack to prevent settling. Most importantly: dedicate a “figure cradle”—a soft foam block with custom-cut grooves—to hold your Spider-Man securely while painting. This eliminates accidental smudging and protects delicate web shooters or mask details.
Planning is where creativity meets execution. Sketch your vision on paper: decide exactly what changes you want—new suit texture? Recolored lenses? Added battle damage? Then break those goals into phases: prep → sculpt → prime → paint → detail → seal. Print your reference images and tape them beside your workstation. Measure key dimensions (e.g., lens width = 3mm, web-line thickness = 0.2mm) and write them down. Finally, do a dry-run with your brushes: dip a size 00 in water and practice steady, feather-light strokes on scrap paper—this builds muscle memory before touching the figure. Remember: the most experienced customizers spend 30% of their time planning. You’re not delaying—you’re designing success.
Step 1: Disassembly, Cleaning, and Surface Prep
This foundational step ensures paint adheres evenly, sculpted details stay crisp, and no hidden grime sabotages your finish. Begin by gently disassembling the figure. Most Marvel Legends figures use friction-fit joints—not screws—so avoid prying. Instead, heat the joint slightly: run warm (not hot) water over the limb connection for 15 seconds, then twist slowly with tweezers gripping the joint peg—not the plastic. Remove arms, legs, and head first; leave torso intact unless modifying the chest emblem. Place each part in a labeled ziplock bag with a sticky note (“L. Arm – Web Shooter Side”).
Next, deep-clean every surface. Soak parts for 10 minutes in warm water mixed with 1 tsp mild dish soap. Use a soft toothbrush (dedicated to crafts!) to agitate crevices—especially around web shooters, mask seams, and finger joints. Rinse thoroughly under cool water, then pat dry with microfiber cloth. Let air-dry completely for 2 hours—moisture under primer causes bubbling.
Now, remove factory paint imperfections. Examine under bright light: look for mold lines (thin ridges where plastic molds met), flash (excess plastic sprues), and overspray (fuzzy color bleed). With your X-Acto blade held at a 15° angle, shave—don’t scrape—along mold lines using short, feather-light strokes. Follow with 600-grit sandpaper wrapped around a pencil for curved surfaces (like biceps), then progress to 1000-grit for smoothing. For tight areas (between fingers or under chin), use a needle file. Tip: Dip the file in water to reduce dust and prevent clogging. Wipe away residue with isopropyl alcohol (90%+) on a cotton swab—this de-greases and reveals remaining flaws.
Finally, prepare for adhesion. Lightly mist each part with plastic primer—hold the can 12 inches away and use 2–3 thin, even coats, waiting 15 minutes between. Avoid thick layers; they obscure detail and crack. Once fully dry (2 hours), lightly buff with 2000-grit wet/dry paper for a silky-smooth base. Your checkpoint? Hold the part under light: it should reflect evenly with zero shiny spots (indicating grease), no visible scratches, and crisp, unblurred details. If you see haze or cloudiness, re-prime. If a seam looks weak, reinforce it now with a hair-thin line of superglue—let cure 1 hour. This step transforms your figure from “store-bought” to “canvas-ready.” You’ve earned your first victory—and your Spider-Man is now truly yours to reimagine.
Step 2: Sculpting and Modifying Details
This step brings personality and realism to your figure—adding texture, depth, and narrative cues. Using Green Stuff (a two-part epoxy putty), you’ll enhance webbing, rebuild damaged areas, or add signature elements like torn fabric, reinforced plating, or organic muscle definition. Start by conditioning the putty: knead equal parts blue and yellow until uniformly green (2 minutes). Work quickly—Green Stuff cures in 2–4 hours, so only mix what you’ll use in the next 30 minutes.
First, redefine the web pattern. Factory webs are often shallow or misaligned. Roll a tiny snake of putty (1mm thick) and press it gently onto the chest emblem area, following the classic spiral layout. Use a toothpick to carve subtle grooves into the web strands—this creates shadow-capturing depth. For 3D web shooters, roll two pea-sized balls, flatten slightly, and attach to forearms with a dot of clear silicone glue. Sculpt tapered “web lines” extending from them using a needle tool, tapering to near-invisibility at the tip.
Next, add tactile realism. Spider-Man’s suit isn’t smooth spandex—it’s textured. Mix a 1:1 ratio of Green Stuff and Vallejo Texture Paste, then stipple it onto the torso and limbs with a stiff-bristle brush (think “tiny popcorn”). Let cure 3 hours. For battle damage, press a crumpled foil ball lightly onto cured putty to create organic scuff marks, then deepen with a scalpel. Crucial tip: Always sculpt slightly oversized—you’ll sand it down later for natural wear.
Common mistakes? Overloading joints with putty (restricts movement) or forgetting to seal sculpted areas before painting (Green Stuff absorbs paint unevenly). Avoid both by applying a thin coat of primer only to sculpted zones after full cure. Also, never use superglue on uncured Green Stuff—it inhibits curing. Visualize success: your chest emblem now has raised, dimensional webs catching light; your forearm shooters protrude with realistic mechanical detail; and subtle fabric wrinkles run along the waistband, suggesting motion and stretch.
Checkpoint confirmation: Hold your figure under angled light. You should see distinct shadows in web grooves, no air bubbles in putty, and zero “flash” (excess putty squeezed out of seams). Gently flex the elbow—if it moves freely without cracking putty, you’ve nailed the balance of detail and function. This isn’t just modification—it’s storytelling in miniature.
Step 3: Painting, Detailing, and Final Assembly
Spiderman Action Figure Custom Figurine Marvel Crouching Web Slinging
This Spiderman action figure is depicted in a powerful, low crouching pose as he prepares to swing from a translucent web line. The figure is…
View Product →Now for the magic: transforming your prepped, sculpted figure into a vibrant, lifelike hero. Begin with base coating. Load a size 1 brush with thinned (70% paint, 30% water) blue acrylic—apply in smooth, overlapping strokes from shoulder to wrist, letting each layer dry 10 minutes. Repeat for red sections (torso, boots, gloves), then black (mask, web lines, belt). Pro tip: Paint large areas first, then move inward—this avoids smudging wet edges. Let base coats dry fully (2 hours).
Next, layer depth and dimension. Mix a “shadow wash”: 1 drop blue paint + 10 drops water + 1 drop matte medium. Apply with a damp size 0 brush into recesses (elbow creases, web grooves, mask folds). The wash settles in low points, creating instant realism. After 5 minutes, gently blot excess with a dry brush. For highlights, mix blue + 15% white, then use a size 00 brush to stroke only the highest curves (biceps peak, cheekbone ridge, web shooter rim).
Now, precision detailing. This is where Spider-Man comes alive. For lenses: use a toothpick dipped in gloss black paint to dot pupils, then layer translucent yellow (1:4 yellow:water) over the entire lens—this mimics the iconic “glowing eye” effect. For web lines: load a size 000 brush with pure white, rest your pinky on the table for stability, and draw one continuous line from web shooter to shoulder—no stopping! If it wobbles, wipe with a damp swab and retry. Mistake to avoid: Painting web lines before base coat dries—they’ll lift. Always wait.
Finally, seal and assemble. Spray 2 light coats of matte varnish (15 min apart), then 1 coat of gloss only on lenses and web shooters for contrast. Let cure 12 hours. Reassemble using silicone glue on joints—this allows future adjustments. Press parts together firmly for 60 seconds. Your checkpoint? Lenses glow with subtle warmth, web lines are razor-thin and unbroken, and the suit transitions smoothly from deep shadow to bright highlight—no chalky patches or muddy edges. You haven’t just painted a toy—you’ve captured a moment of heroic motion.
Troubleshooting Common Issues
Even seasoned customizers hit snags—here’s how to solve the three most frequent challenges calmly and effectively.
Problem 1: Paint lifting or wrinkling
This usually stems from moisture, oil, or incompatible layers. If paint bubbles after varnish, the surface wasn’t fully degreased—or you applied gloss over uncured matte. Solution: Gently sand the affected area with 2000-grit paper, wipe with isopropyl alcohol, re-prime, and repaint. If lifting occurs mid-base coat, stop immediately—let dry, then lightly sand only the lifted edge before continuing. Never paint over wet layers.
Problem 2: Web lines bleeding or appearing fuzzy
Caused by too much water in paint, a worn brush tip, or rushing. Solution: Rinse your size 000 brush thoroughly, reshape the point with tweezers, and test on paper first. Thin paint with acrylic medium, not water—it controls flow without weakening pigment. If lines blur, let dry, then re-outline with undiluted white using a new brush. Patience beats pressure every time.
Problem 3: Joint stiffness or separation after assembly
Often due to excess glue or uncured Green Stuff near pivot points. Solution: Disassemble carefully (warm water soak again), clean glue residue with acetone on a Q-tip, then reattach with one microscopic dot of silicone glue—no more than the size of a grain of salt. Let cure 24 hours before posing.
When to seek professional help? If your figure has structural cracks in load-bearing joints (hips, spine), irreversible chemical damage (melting from solvent exposure), or electronic components (LED suits) failing, consult a certified toy restoration specialist. Their micro-welding tools and archival adhesives go beyond DIY scope—and preserving value matters. But 95% of issues? They’re fixable with calm hands and this guide. Remember: Peter Parker failed countless times before mastering his powers. Your first custom Spider-Man doesn’t need to be perfect—it needs to be yours.
Final Touches and Maintenance
You’re nearly there—now it’s time to elevate your creation from “great” to “gallery-worthy.” Begin with final detailing passes. Use a fine liner pen (Micron 005) to reinforce web-line edges where paint softened, then add micro-scratches on boots with a dry 2000-grit sponge for authentic street-wear. For a weathered look, dry-brush a whisper of gray over knuckles and elbows—load brush, wipe 90% off on paper, then skim lightly. Seal everything with a final coat of UV-resistant matte varnish (Krylon Preserve It) to prevent yellowing.
Conduct a rigorous quality check: Rotate the figure under daylight-equivalent LED light. Look for:
✅ Uniform color saturation (no streaks or thin spots)
✅ Zero fingerprints or dust specs (use a lens blower, not cloth)
✅ All joints articulate smoothly through full range
✅ Web lines remain crisp at 12-inch viewing distance
✅ Lenses reflect light evenly—no cloudiness
For long-term maintenance, display your Spider-Man away from direct sunlight (UV fades plastics) and HVAC vents (dry air embrittles joints). Dust monthly with a soft makeup brush—never compressed air, which can force debris into seams. Every 6 months, inspect joints: if stiffness returns, apply one drop of plastic-safe lubricant (Graffiti Supply’s Pivot Lube) to the peg, then cycle the joint 20 times. Store in a sealed display case with silica gel packs to control humidity.
Enhancement suggestions? Add interactivity: embed a 3mm LED (wired to a coin-cell battery hidden in the torso) for glowing eyes—use red LEDs for classic mode, blue for suit variants. Upgrade articulation with stainless-steel joint pins for smoother poses. Or go thematic: mount him on a 3D-printed NYC rooftop base with removable web-lines (clear fishing line glued to anchor points). Most importantly—take photos! Document your process and share online. The custom figure community thrives on encouragement, feedback, and shared inspiration. Your Spider-Man isn’t just a static object; he’s a testament to your growth, creativity, and dedication. Hang him proudly—not as merchandise, but as a milestone. Because in the end, the greatest power isn’t sticking to walls… it’s believing you can build something extraordinary, one careful step at a time. 🕷️✨


