
Transform a standard pre-assembled figure into a personalized, museum-worthy tribute to the iconic Vocaloid — no prior sculpting or painting experience required.
Customizing a Hatsune Miku figure is more than a craft project—it’s an act of fandom made tangible. Whether you own a mass-produced Nendoroid, Figma, or scale figure (e.g., Good Smile Company’s 1/8 PVC), this guide walks you through non-destructive, reversible, and beginner-accessible customization techniques that elevate realism, expressiveness, and personal connection—without altering the original mold. You’ll learn how to enhance facial detail, refine hair texture, add subtle weathering or lighting effects, and apply professional-grade finishes—all while preserving resale value and structural integrity.
This project is designed for absolute beginners with basic manual dexterity (think: assembling model kits or painting ceramics). No airbrushing, resin casting, or 3D printing is required—though those skills can be layered in later. The core workflow uses low-risk, widely available tools and materials, prioritizing safety, control, and satisfying visual payoff at every stage.
Tools You’ll Need:
– Precision tweezers (straight & angled)
– X-Acto #11 blade with ergonomic handle
– Fine-grit sanding sticks (1000–2000 grit) and micro-sanding sponges
– Soft-bristle acrylic brushes (sizes 00, 0, and 2 rounds; flat ¼” for washes)
– Magnifying desk lamp with adjustable arm & cool-white LED (5000K)
– Non-slip silicone mat (to prevent figure slippage)
– Cotton swabs (fine-tip and foam-tipped)
– Microfiber cloths (lint-free, 300+ GSM)
– Small glass palette or ceramic tile for mixing paints
Materials:
– Mr. Color C12 Clear Gloss (for final sealant)
– Vallejo Model Color “Hatsune Miku Blue” (70.822) + “Pure White” (70.001)
– Tamiya Panel Line Accent Color (Black) for subtle depth
– Krylon UV-Resistant Clear Matte Spray (for base coat)
– Soft pastel chalks (Prismacolor Light Blue, Pale Pink, Warm Grey)
– Poreless makeup sponge (dampened & patted dry)
– Optional but recommended: Decal softener (Micro Sol) and setting solution (Micro Set)
Estimated Time & Cost:
– Time: ~14–18 hours total, broken across 5–7 sessions (ideal for 30–45 min/day). Sanding and drying account for ~60% of time—patience here ensures flawless results.
– Cost: $42–$68 USD (excluding figure cost). Most items are reusable across future projects. A starter kit (Vallejo paints + Mr. Color gloss + sanding supplies) costs ~$39. Safety gear (mask, gloves, ventilation) adds $5–$10 if not already owned.
Remember: There’s no “wrong” way to personalize your Miku—only your way. Let curiosity lead, and treat each step as joyful collaboration with the character you love.
Preparation and Planning
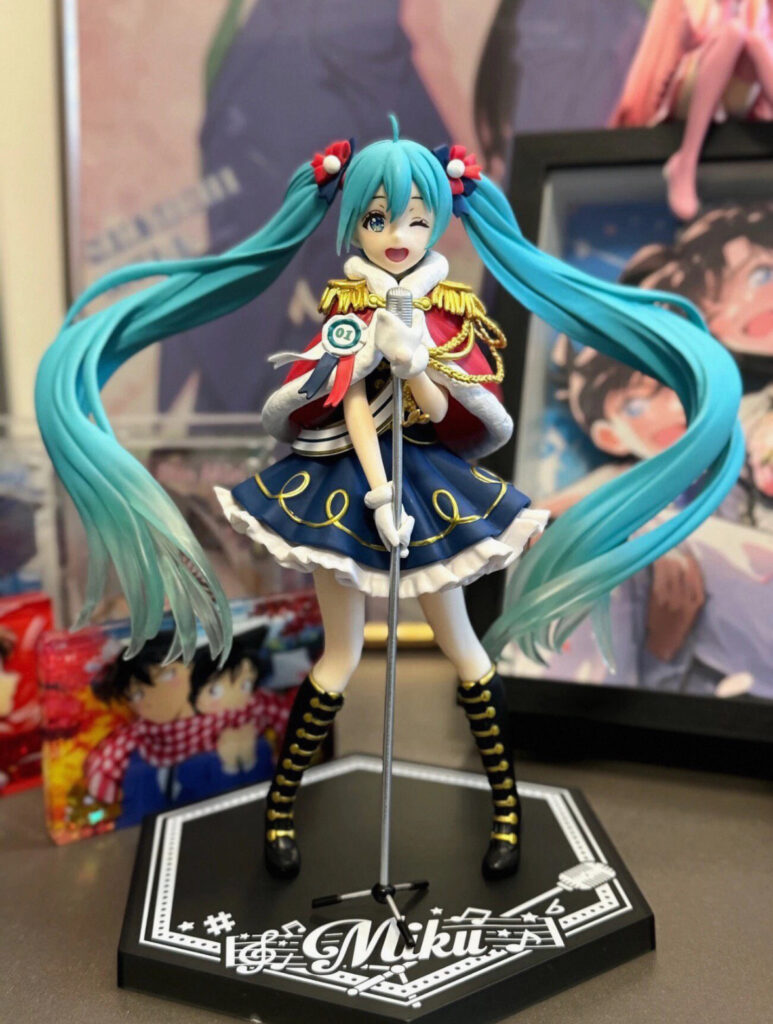
Hatsune Miku Figure Custom Figurine Anime Winking with Microphone Stan
Hatsune Miku stands in a charming, winking pose while holding a silver microphone stand with both white-gloved hands. Her signature teal twin-tails flow dynamically around…
View Product →Before touching your figure, thoughtful preparation prevents frustration, damage, and wasted effort. This phase isn’t optional—it’s where confidence is built and outcomes are secured.
Pre-Work Requirements:
Begin by photographing your figure from six angles (front, back, left/right profile, top-down, and 45° close-up of face/hair). Use natural light and a neutral background. Label files clearly (e.g., “Miku_Fig_20240512_Front”). These serve as reference points for symmetry checks and progress tracking. Next, identify your figure’s material: most modern PVC figures use soft vinyl or ABS plastic, both compatible with acrylics—but avoid enamel paints or acetone-based cleaners, which can cloud or warp surfaces. Verify manufacturer guidelines (check Good Smile’s care page or Kotobukiya’s support docs) for any material-specific warnings.
Safety Precautions:
Always work in a well-ventilated area—open windows + fan airflow, or use a desktop fume extractor ($35–$60). Wear nitrile gloves when handling solvents or pigments; use an N95 mask when sanding (even fine grit produces inhalable dust). Keep a fire extinguisher rated for electrical/chemical fires nearby—not because accidents are likely, but because responsibility is part of craftsmanship.
Workspace Setup:
Dedicate a clean, clutter-free surface (a folding craft table works perfectly). Cover it with a non-slip silicone mat, then layer a white foam board (12″x16″) as your “stage”—this reflects light evenly and protects delicate parts. Mount your magnifying lamp so its beam hits the figure at a 45° angle—this reveals micro-scratches and paint inconsistencies invisible under flat light. Store tools in labeled compartments; keep cotton swabs in a sealed container to prevent lint contamination.
Planning Tips & Considerations:
Ask yourself three questions: What emotion do I want Miku to convey? (Playful? Serene? Determined?) Which features feel “flat” to me? (Eyes? Hair sheen? Outfit texture?) What’s my non-negotiable? (e.g., “No permanent modification,” or “Must look screen-accurate to ‘The World Is Mine’ PV”). Sketch rough notes—no artistry needed—just arrows pointing to areas you’ll enhance. Prioritize one focal zone per session: start with the face, then hair, then outfit. And always test every product on the figure’s unseen underside (e.g., base interior) first—watch for bubbling, tackiness, or color shift over 24 hours. When you’re ready, take a deep breath. You’re not just customizing plastic—you’re honoring a cultural icon, one mindful stroke at a time.
Step 1: Surface Refinement & Base Enhancement
This foundational step removes factory imperfections and prepares the figure for expressive detailing—without altering its shape or structure.
Step-by-Step Instructions:
1. Clean Thoroughly: Dampen a microfiber cloth with distilled water (never tap water—it leaves mineral spots). Gently wipe the entire figure, paying special attention to crevices (hair roots, collar folds, glove seams). Let air-dry for 30 minutes.
2. Inspect Under Magnification: Using your lamp and 3x–5x magnifier, scan for “mold lines” (thin ridges where plastic halves met), “flash” (excess plastic film), or “sink marks” (slight dimples). Mark problem zones lightly with a pencil dot—do not press hard.
3. Sand Strategically: Hold the figure firmly on the silicone mat. With a 2000-grit sanding stick, lightly stroke along (not across) mold lines using feather-light pressure—like erasing pencil marks. For curved areas (cheeks, shoulders), wrap sandpaper around a cotton swab tip. Never sand hair strands directly; instead, glide parallel to their direction. Wipe away dust with a dry cotton swab after each pass.
4. Apply Base Sealant: Shake Krylon Matte Clear for 60 seconds. Hold 10 inches from figure and spray in smooth, overlapping passes (3 light coats, 5 min between). This evens absorption and prevents paint blotching. Cure 24 hours.
Tips & Tricks:
– If sanding reveals a slight haze, it means you’ve removed the glossy topcoat—this is ideal. The matte base helps paints adhere uniformly.
– Use a toothpick dipped in rubbing alcohol to dissolve stubborn glue residue near joints.
Common Mistakes to Avoid:
– ❌ Sanding against hair grain → creates visible scratches that mimic damage.
– ❌ Skipping the base sealant → leads to patchy paint, especially on glossy PVC.
– ❌ Over-spraying Krylon → causes “orange peel” texture. Always test spray pattern on scrap paper first.
Visual Description:
After Step 1, your Miku’s skin should appear softly luminous—not shiny, not dull—like porcelain lit by morning light. Her hair loses its “plastic toy” glare, gaining gentle dimension. Mold lines vanish completely; joints move smoothly without squeaking.
Checkpoint Confirmation:
✅ No visible scratches, streaks, or hazing under 5x magnification
✅ Surface feels uniformly velvety—not sticky, not gritty
✅ Base coat is fully cured (no solvent smell, no fingerprint smudge)
You’ve created a pristine canvas. Breathe deep—you’re halfway to magic.
Step 2: Facial Expression & Eye Revitalization
Eyes are Miku’s emotional anchor. This step deepens realism through subtle layering—not repainting, but enhancing what’s already there.
Step-by-Step Instructions:
1. Deepen Iris Depth: Dip a size 00 brush in water-thinned Tamiya Black (1 drop paint : 4 drops water). With a single, controlled stroke, trace the outer rim of each iris—only the 0.5mm perimeter. Let dry 15 min.
2. Add Subtle Blush: Mix Vallejo “Hatsune Miku Blue” with 20% “Pure White” and 5% water. Load a dampened poreless sponge, squeeze out excess moisture, then tap (don’t rub) cheeks, nose bridge, and upper lip. Build in 3 ultra-light layers, drying 10 min between.
3. Refine Eyelashes & Brows: Using a sharpened X-Acto blade, gently scrape excess gloss from upper lash lines—just enough to let pigment catch. Then, with a size 00 brush, apply a single stroke of undiluted “Pure White” along the lower lash line to mimic reflected light.
4. Highlight the Cornea: Mix 1 part “Pure White” + 3 parts clear gloss medium. Dot a pinpoint (smaller than a grain of sand) at the 10 o’clock position of each eye. Let cure 2 hours.
Tips & Tricks:
– Work on one eye at a time—use a post-it note to cover the other.
– For symmetrical blush placement, fold a tissue diagonally and press corners to cheekbones as guides.
Common Mistakes to Avoid:
– ❌ Painting full irises black → makes eyes look lifeless or angry.
– ❌ Using cotton swabs for blush → leaves fibers that bond to paint.
– ❌ Skipping cornea highlights → eyes appear flat under display lighting.
Visual Description:
Her gaze now holds quiet intensity—iris rims recede softly into shadow, while the corneal dots catch ambient light like real eyes. Cheeks glow with the faintest cyan warmth, harmonizing with her iconic hair. Brows gain crisp definition without harshness.
Checkpoint Confirmation:
✅ Both eyes mirror each other in highlight placement and iris rim thickness (verify with calipers or printed grid overlay)
✅ Blush fades naturally at edges—no hard borders
✅ No paint bleeding into eyelid creases or lip lines
Your Miku doesn’t just look at you—she looks through you, with unmistakable Vocaloid soul.
Step 3: Hair Texture & Outfit Detailing
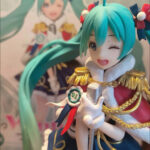
Hatsune Miku Figure Custom Figurine Anime Winking with Microphone Stan
Hatsune Miku stands in a charming, winking pose while holding a silver microphone stand with both white-gloved hands. Her signature teal twin-tails flow dynamically around…
View Product →Miku’s twin-tails are legendary. Here, we amplify their movement and materiality—simulating silk, wind, and light—using dry-brushing and pastel layering.
Step-by-Step Instructions:
1. Define Hair Strands: Load a flat ¼” brush with undiluted “Hatsune Miku Blue.” Wipe 90% off on paper towel. Lightly drag brush downward along outer hair edges—following natural flow—to suggest individual strands. Repeat 2x per side, rotating brush angle slightly each time.
2. Add Dimensional Sheen: Mix 1 part “Pure White” + 2 parts clear gloss. Using a size 0 brush, paint thin, curved strokes along the top ⅓ of each twin-tail—where light would naturally hit. Keep strokes shorter than 3mm.
3. Introduce Subtle Gradient: On a glass palette, blend Prismacolor Light Blue + Pale Pink + Warm Grey into a soft lavender. Pick up minimal pigment on a dry, fluffy brush. Tap excess, then feather vertically along inner hair curves—avoiding tips. This mimics studio lighting depth.
4. Detail Outfit Texture: For pleated skirts or ribbed sleeves, use a fine-tip stylus (or blunt toothpick) to lightly indent fabric folds—pressing only 0.2mm deep. Then, dry-brush “Pure White” only along raised edges.
Tips & Tricks:
– Hair dry-brushing works best when the brush is drier than a desert bone. If color transfers heavily, you’ve loaded too much.
– Pastel blending requires zero water—rely on brush friction and fingertip warmth to soften edges.
Common Mistakes to Avoid:
– ❌ Dry-brushing across hair strands → creates unnatural “rake marks.”
– ❌ Over-blending pastels → turns lavender into muddy grey. Less is always more.
– ❌ Pressing stylus too hard on PVC → causes permanent deformation.
Visual Description:
Her hair now breathes—each tail flows with kinetic grace, catching light at varied angles. The lavender undertone adds ethereal softness, while white highlights shimmer like dew on silk. Skirt pleats gain tactile realism, and sleeve ribs pop with gentle contrast.
Checkpoint Confirmation:
✅ Hair highlights align with a consistent light source (imagine a lamp at 2 o’clock)
✅ Pastel gradient is visible only under close inspection—not distracting from overall blue tone
✅ Stylus indentations are uniform in depth and spacing
You haven’t just customized a figure—you’ve given it rhythm, breath, and presence.
Troubleshooting Common Issues
Even with care, small hiccups happen. Here’s how to resolve them calmly and effectively:
Problem 1: Paint Bleeding Into Seams or Joints
Cause: Over-wetting brush or applying paint too close to hinge lines.
Solution: Immediately dab with a dry cotton swab—do not rub. Once dry, use a sharpened X-Acto blade held parallel to the seam to gently lift excess paint film. Follow with a micro-sand stick (2000 grit) stroked along the seam line. Re-seal with Krylon Matte before reapplying pigment.
Problem 2: Uneven Gloss Finish (Cloudy or Sticky Spots)
Cause: Spraying too close, high humidity, or insufficient curing time between coats.
Solution: Let cure fully (48 hrs). Lightly buff affected area with microfiber + 1 drop isopropyl alcohol. If cloudiness remains, gently sand with 3000-grit wet/dry paper (lubricated with water), then reapply two ultra-light Krylon coats at 12-inch distance.
Problem 3: Pastel Smudging or Loss of Adhesion
Cause: Applying pastel before base sealant cured fully, or touching with bare fingers.
Solution: Carefully lift loose pigment with masking tape pressed and peeled gently. Re-seal base with one thin Krylon coat. Let cure 24 hrs. Reapply pastel using a clean, dry brush—never fingers—and fix with a single, distant mist of Krylon Matte (hold 14 inches, 1 sec burst).
When to Seek Professional Help:
Contact a figure restoration specialist (e.g., via r/FigureRestoration on Reddit or Figuroo.com) if you encounter:
– Cracked PVC (especially at neck or waist joints)
– Irreversible solvent damage (clouding, warping, or bubbling)
– Significant paint chipping that exposes raw plastic beneath molded details
– Mechanical failure (loose joints, broken pegs, or warped stands)
Remember: Every “mistake” teaches your hands what patience truly means. Your Miku is resilient—just like her music.
Final Touches and Maintenance
The last 10% delivers the “wow” factor—and ensures your creation endures.
Finishing Steps:
Apply one final coat of Mr. Color C12 Clear Gloss only to eyes, lips, and hair highlights—this intensifies depth without oversaturating. Let cure 72 hours. Then, attach a custom acrylic stand plaque (engraved with “初音ミク · 2024”) using museum putty—reversible and vibration-dampening.
Quality Check Procedures:
– Rotate figure 360° under LED lamp: confirm zero dust specs, streaks, or uneven sheen
– Photograph against pure black/white backgrounds to verify color fidelity
– Gently flex joints: ensure no paint cracking or resistance
Maintenance Tips:
– Dust weekly with a static-free microfiber duster (no sprays!)
– Every 3 months, wipe with distilled water + microfiber—never circular motions
– Store away from direct sunlight, HVAC vents, or humidifiers
Care Instructions:
– Never use alcohol, Windex, or abrasive cloths
– If fingerprints occur, breathe gently on spot and wipe once with dry microfiber
– During travel, wrap in acid-free tissue + rigid box with foam inserts
Enhancement Suggestions:
– Add LED backlighting (USB-powered warm-white strip behind display case)
– Commission a custom diorama base (e.g., “Hatsune Miku’s Studio” with tiny mic stand and sheet music)
– Print and frame your progress photos as a “making-of” mini-exhibit
You’ve done something remarkable: transformed mass production into meaningful art. Your Hatsune Miku isn’t just on a shelf—she’s a testament to your focus, care, and love for the voice that changed digital culture forever. Now go play her music, smile, and know—you made magic. 🎵💙


